In this post, I will be documenting the process of creating a software synthesis system which interfaces with hardware MIDI devices. The goal of this project is to bring together the powerful expressiveness of software synthesis with the intuition of hardware interaction. I have a MIDI controller that I would like to bring into the mix more (so to speak) in my music workflow. The great thing about hardware designed to work with software on a computer is that it offers a lot of flexibility; however, that comes with the price of requiring a bit of effort and creativity on the software end to take full advantage of the hardware. When it comes to digital sound synthesis, there is perhaps no program more powerful than SuperCollider. SuperCollider runs as a server which can be sent commands from clients. The server is usually are controlled using the `sclang` programming language. The program and language are designed specifically for electroacoustics and generative music. See the video below for an example of a project that used SuperCollider for both of these functions. The laptop as an instrument is a rather new concept, but the techniques used in digital synthesis and generative music are decades old. With this project, I aim to tap into and expand upon that legacy. SuperCollider has its own IDE called SuperCollider works by interfacing with the JACK Audio Connection Kit. Like SuperCollider itself, JACK works as a server that directs signals from many different sources. It is designed for real-time audio applications and thus tends to have very low latency. I use a suite of tools called Cadence to control and connect my JACK applications. The figure above shows how I have wired together the SuperCollider server with my system capture (microphone) and system playback (speakers or headphones). Using JACK allows SuperCollider to interact with other audio programs such as a DAW (digital audio workstation). Now that I have all the tools needed to run SuperCollider set up, let’s start making some noise. I first needed to boot up Emacs running the SuperCollider environment. I then booted the SuperCollider server. This sound will play indefinitely until we free the function. Running and then freeing the function produces the following output: We now have sound being generated by SuperCollider. In the next post, I will be setting up MIDI input. The previous section demonstrated the process of setting up SuperCollider and generating a tone. In this next post, I will be explaining how to set up MIDI input in SuperCollider. MIDI is a standard protocol that dates back to the early 1980s. It supports up to sixteen channels and can be used to communicate pitch, velocity, and other information important for the operation of musical instruments. In the long term, I would like to be able to choose different timbres by mapping them to different MIDI channels. I would also like to be able to change parameters using control change messages. First, however, I needed to set up SuperCollider to accept MIDI input. Start the SuperCollider server if it is not already running. From the Catia patchbay, it is clear that the SuperCollider instance does not currently accept MIDI input. We can change this by running On my system, this created three MIDI input ports and one output port. In this case, I was only interested in controlling the server from one source, so I only needed one MIDI input. The documentation for Now I had one input port and one output port. I then opened my DAW and created a simple MIDI pattern in the piano roll. I then configured the DAW to export any MIDI playback on that track to the program’s output. Connecting the DAW’s output to SuperCollider’s printed gave the following information: This indicates that the source is identified by the integer 8454144 and that the MIDI notes were sent on the first channel (they are indexed starting with zero). The third number in the arrays represent notes and the last number represents the velocity of the note (ranging from zero to 127). We can filter the notes such that the function is only called for a certain source or channel: Down the road, this will give us the ability to set up multiple instruments that can be selected using the MIDI channel. Being able to control a polyphonic instrument in MIDI is good, but being able to control multiple instruments is even better. SuperCollider offers a lot of flexibility when it comes to timbre. For my personal workflow, I like to try out a lot of different sounds to see what best in the mix. Thus when thinking about how I want to use the MIDI controller in connection with SuperCollider, it makes sense to me to be able to switch between instruments fluidly. If you do not want to start from scratch, there are a number of excellent resources for finding SuperCollider =SynthDef=s: To start, I copied a few I considered these sounds to be a good starting point for emulating many classic keyboard instruments. To allow these different timbres to be selected, I made a few changes to the function defined in the last section. First, I created a second array with sixteen elements to hold the names of the different `SynthDef`s. I then modified the Now I could select the appropriate instrument by simply changing the MIDI channel on my controller. Putting it all together, I created a simple track to demonstrate these different timbers (accompanied with some mandolin): This posts has worked through some building blocks for using SuperCollider as a platform for creativity. As I wrote in “The Paradox of Creativity”, I find the creative process to be best when applied to areas that are challenging. I believe it is for this reason that I find SuperCollider to be such an interesting platform: it provides the pieces for expansive sonic possibilities, but it takes a bit of effort and curiosity to make the most of it.Getting Started
Motivation
Development Tools
scide, but I will be working in the Emacs development environment. Emacs is a general purpose text editor which I use for most of my work that involves plain text. Emacs is well suited for SuperCollider development because Emacs itself runs with a REPL (Read–eval–print loop). This encourages a workflow of writing small chucks of code, sending them to the server to be evaluated, and then analyzing the results.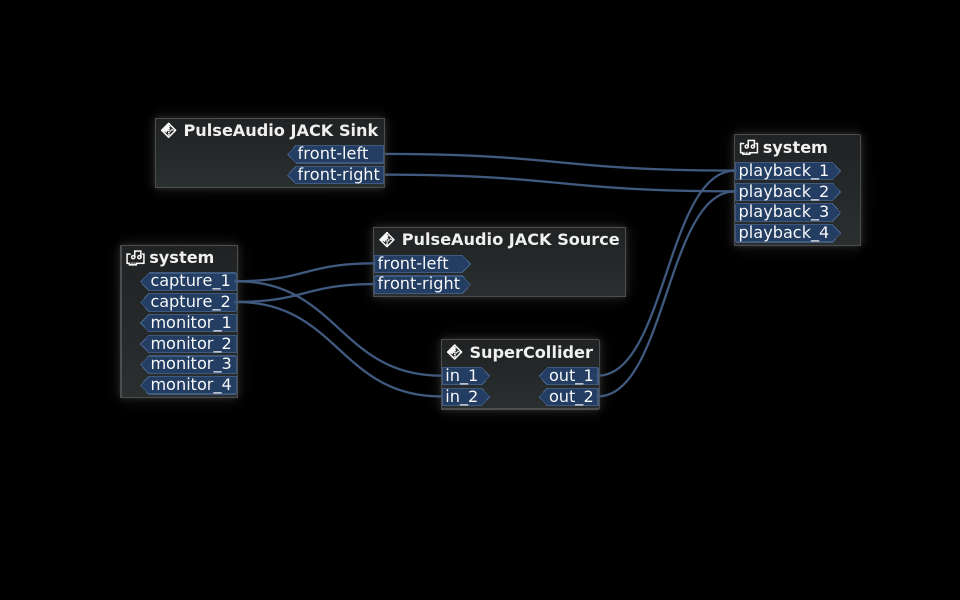
Making Some Sounds
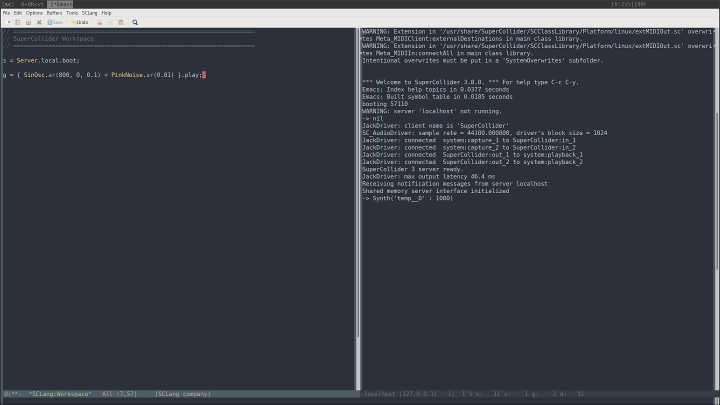
emacs -sclangs = Server.local.boot;s is a special variable that is used exclusively for the Server. The other letters of the alphabet can be used as global variables. It is best to attach functions or any other sound generator to a variable so that they can be stopped or modified when needed. To start, I used a function that combined a sine oscillator with pink noise. The arguments for the sine oscillator indicate frequency, phase, and amplitude. The argument for the PinkNoise generator indicates volume.g = { SinOsc.ar(440, 0, 0.1) + PinkNoise.ar(0.01) }.play;g.free;Making Connections: MIDI in SuperCollider
Enabling MIDI in SuperCollider
s.boot;MIDIClient.init;
MIDIIn.connectAll;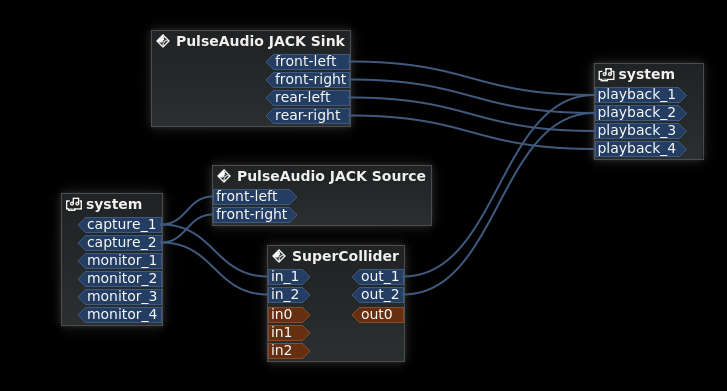
MIDIClient shows by default running MIDIClient.init “opens as many inports as there are MIDI sources”. To only have one inport, I reset the MIDIClient and reinitialized it with the correct number of ports specified.MIDIClient.disposeClient;
MIDIClient.init(1, 1);Getting input
MIDIdef.noteOn allows us to run a function whenever a note is pressed. To test this out, I created a simple function that prints the associated MIDI information whenever a key is pressed.MIDIdef.noteOn(\print, {arg val, num, chan, src; [src,chan, num, val].postln});[ 8454144, 0, 60, 127 ]
[ 8454144, 0, 63, 127 ]
[ 8454144, 0, 67, 127 ]
[ 8454144, 0, 65, 59 ]
[ 8454144, 0, 68, 59 ]
[ 8454144, 0, 72, 59 ]MIDIdef.noteOn(\test4, {arg val, num, chan, src;
[src,chan, num, val].postln;
}, chan: 1);Mapping MIDI Channels to Multiple Instruments in SuperCollider
Finding some sounds
SynthDefs:SynthDef.SynthDef which uses MdaPiano, a generator provided by sc3-plugins.Switching instruments
// https://gist.github.com/umbrellaprocess/973d2aa16e95bf329ee2
var keys, instruments;
keys = Array.newClear(128);

instruments = Array.newClear(16);
instruments.put(0, \sinpk);
instruments.put(1, \piano);
instruments.put(2, \rhodey_sc);
instruments.put(3, \hammond);NoteOn function such that the correct instrument is selected based on its position in the `instruments` array.~noteOnFunc = {arg val, num, chan, src;
var node;
node = keys.at(num);
if (node.notNil, {
node.release;
keys.put(num, nil);
});
node = Synth(instruments.at(chan), [\freq, num.midicps, \vel, val]);
[num, chan].postln;
keys.put(num, node);
};A quick demo